
For A 1989 Mercruiser Wiring Diagrams
- Category : Wiring Diagrams
- Post Date : January 27, 2026
For A 1989 Mercruiser Wiring Diagrams
Mercury Outboard Motor Parts Diagram

Mercruiser Gm V8 5 0l 5 7l 7 4l 8 2l Marine Engine Full

Force Outboard Motor Wiring Diagram

1989 Mazda 323 Factory Shop Manual U0026 Wiring Diagrams
Wiring Mess On Tracker Pro Guide 16 Need Wiring Diagram

454 Mercruiser Engine Wiring Diagram

Lutron 4 Way Dimmer Wiring Diagram

Yanmar Marine Ignition Switch Wiring Diagram

Diesel Generator Wiring Diagram Alternator Charging
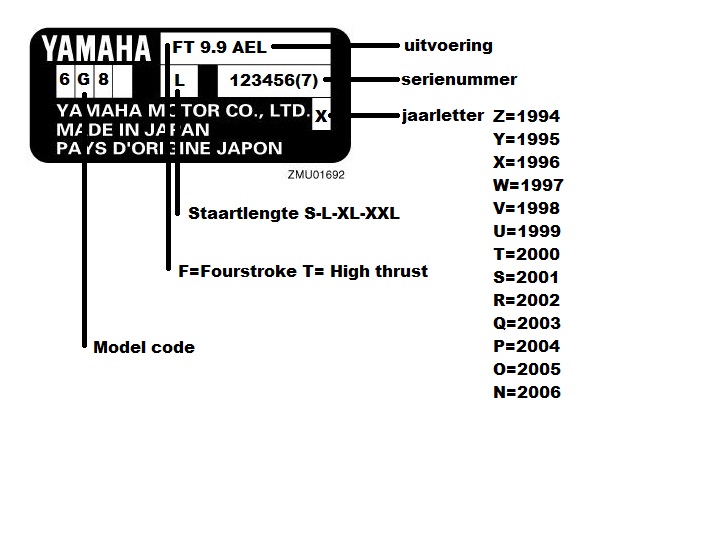
Yamaha Outboard Motor Serial Number
Diagram For A 1989 Mercruiser Wiring Diagrams
Download For A 1989 Mercruiser Wiring Diagrams
Dealing with a wobbly toilet? Our step by step guide explains how to install a new toilet flange to help resecure it.
Learn how to install a toilet flange like a pro with Ron King’s step by step guide.
If your flange is loose or deteriorating, it can leak and erode the surrounding flooring, causing significant damage over time. This guide explains how to install a toilet flange on your existing toilet for cleaner and more efficient drainage.
When a toilet is leaking from the base, you may need to replace the flange, which connects the toilet to the bathroom floor. Whether your subfloor is wood or concrete, we’ve got all the steps you need to properly install a new flange and get your toilet up and running again.
Learn how to install a toilet flange step by step, from choosing the right flange type and prepping the drain pipe and floor to solvent welding and anchoring.
By following our step by step instructions, you’ll not only learn how to install a toilet flange but also gain valuable DIY skills. So why not take control of your home maintenance and dive into this simple yet rewarding task? Your bathroom – and your wallet – will thank you.
Explore the world of installing toilet flange and how to replace a toilet flange? This guide covers all you need to know with expert advice from Mr. Rooter.
In this detailed guide, we’ll cover everything you need to know about how to install a toilet flange in 8 steps, including best practices, common questions like whether the flange should sit flush with the floor, how far it should stick up, and more.
In this guide, we’ll walk you through the steps. NOTE: Replace the toilet flange DIY only if you’re confident in your abilities and willing to assume all risks. What’s a Toilet Flange? A toilet flange serves as the interface between the bottom of the toilet and the drainage pipe.
Replacing a toilet flange is a crucial plumbing job that can save you from leaks and future headaches. If you’re tackling this project yourself, you’ll need a clear understanding of how to put toilet flange in correctly. This comprehensive guide will walk you through the process, step by step, ensuring a smooth and successful installation.
3 way switch,3 way switch wiring,3 way switch wiring diagram pdf,3 way wiring diagram,3way switch wiring diagram,4 prong dryer outlet wiring diagram,4 prong trailer wiring diagram,6 way trailer wiring diagram,7 pin trailer wiring diagram with brakes,7 pin wiring diagram,alternator wiring diagram,amp wiring diagram,automotive lighting,cable harness,chevrolet,diagram,dodge,doorbell wiring diagram,ecobee wiring diagram,electric motor,electrical connector,electrical wiring,electrical wiring diagram,ford,fuse,honeywell thermostat wiring diagram,ignition system,kenwood car stereo wiring diagram,light switch wiring diagram,lighting,motor wiring diagram,nest doorbell wiring diagram,nest hello wiring diagram,nest labs,nest thermostat,nest thermostat wiring diagram,phone connector,pin,pioneer wiring diagram,plug wiring diagram,pump,radio,radio wiring diagram,relay,relay wiring diagram,resistor,rj45 wiring diagram,schematic,semi-trailer truck,sensor,seven pin trailer wiring diagram,speaker wiring diagram,starter wiring diagram,stereo wiring diagram,stereophonic sound,strat wiring diagram,switch,switch wiring diagram,telecaster wiring diagram,thermostat wiring,thermostat wiring diagram,trailer brake controller,trailer plug wiring diagram,trailer wiring diagram,user guide,wire,wire diagram,wiring diagram,wiring diagram 3 way switch,wiring harness
