
Peugeot Engine Diagrams
- Category : Engine Diagrams
- Post Date : January 27, 2026
Peugeot Engine Diagrams
Morgan Motors
Tecumseh Ah520
Husqvarna Yth24v48
Husqvarna Yt48cs
Mtd 216
Snapper Eh18v 6 5 Hp 4 Cycle Ohv Robin Engine Parts
Engine And Jet Drive

Omrg33363 8 1 L 6081hfn04 Natural Gas Engines Block File
Honda Engines G30 A Engine Jpn Vin G30
Robin Subaru Ex21 Parts Diagram For Crankcase
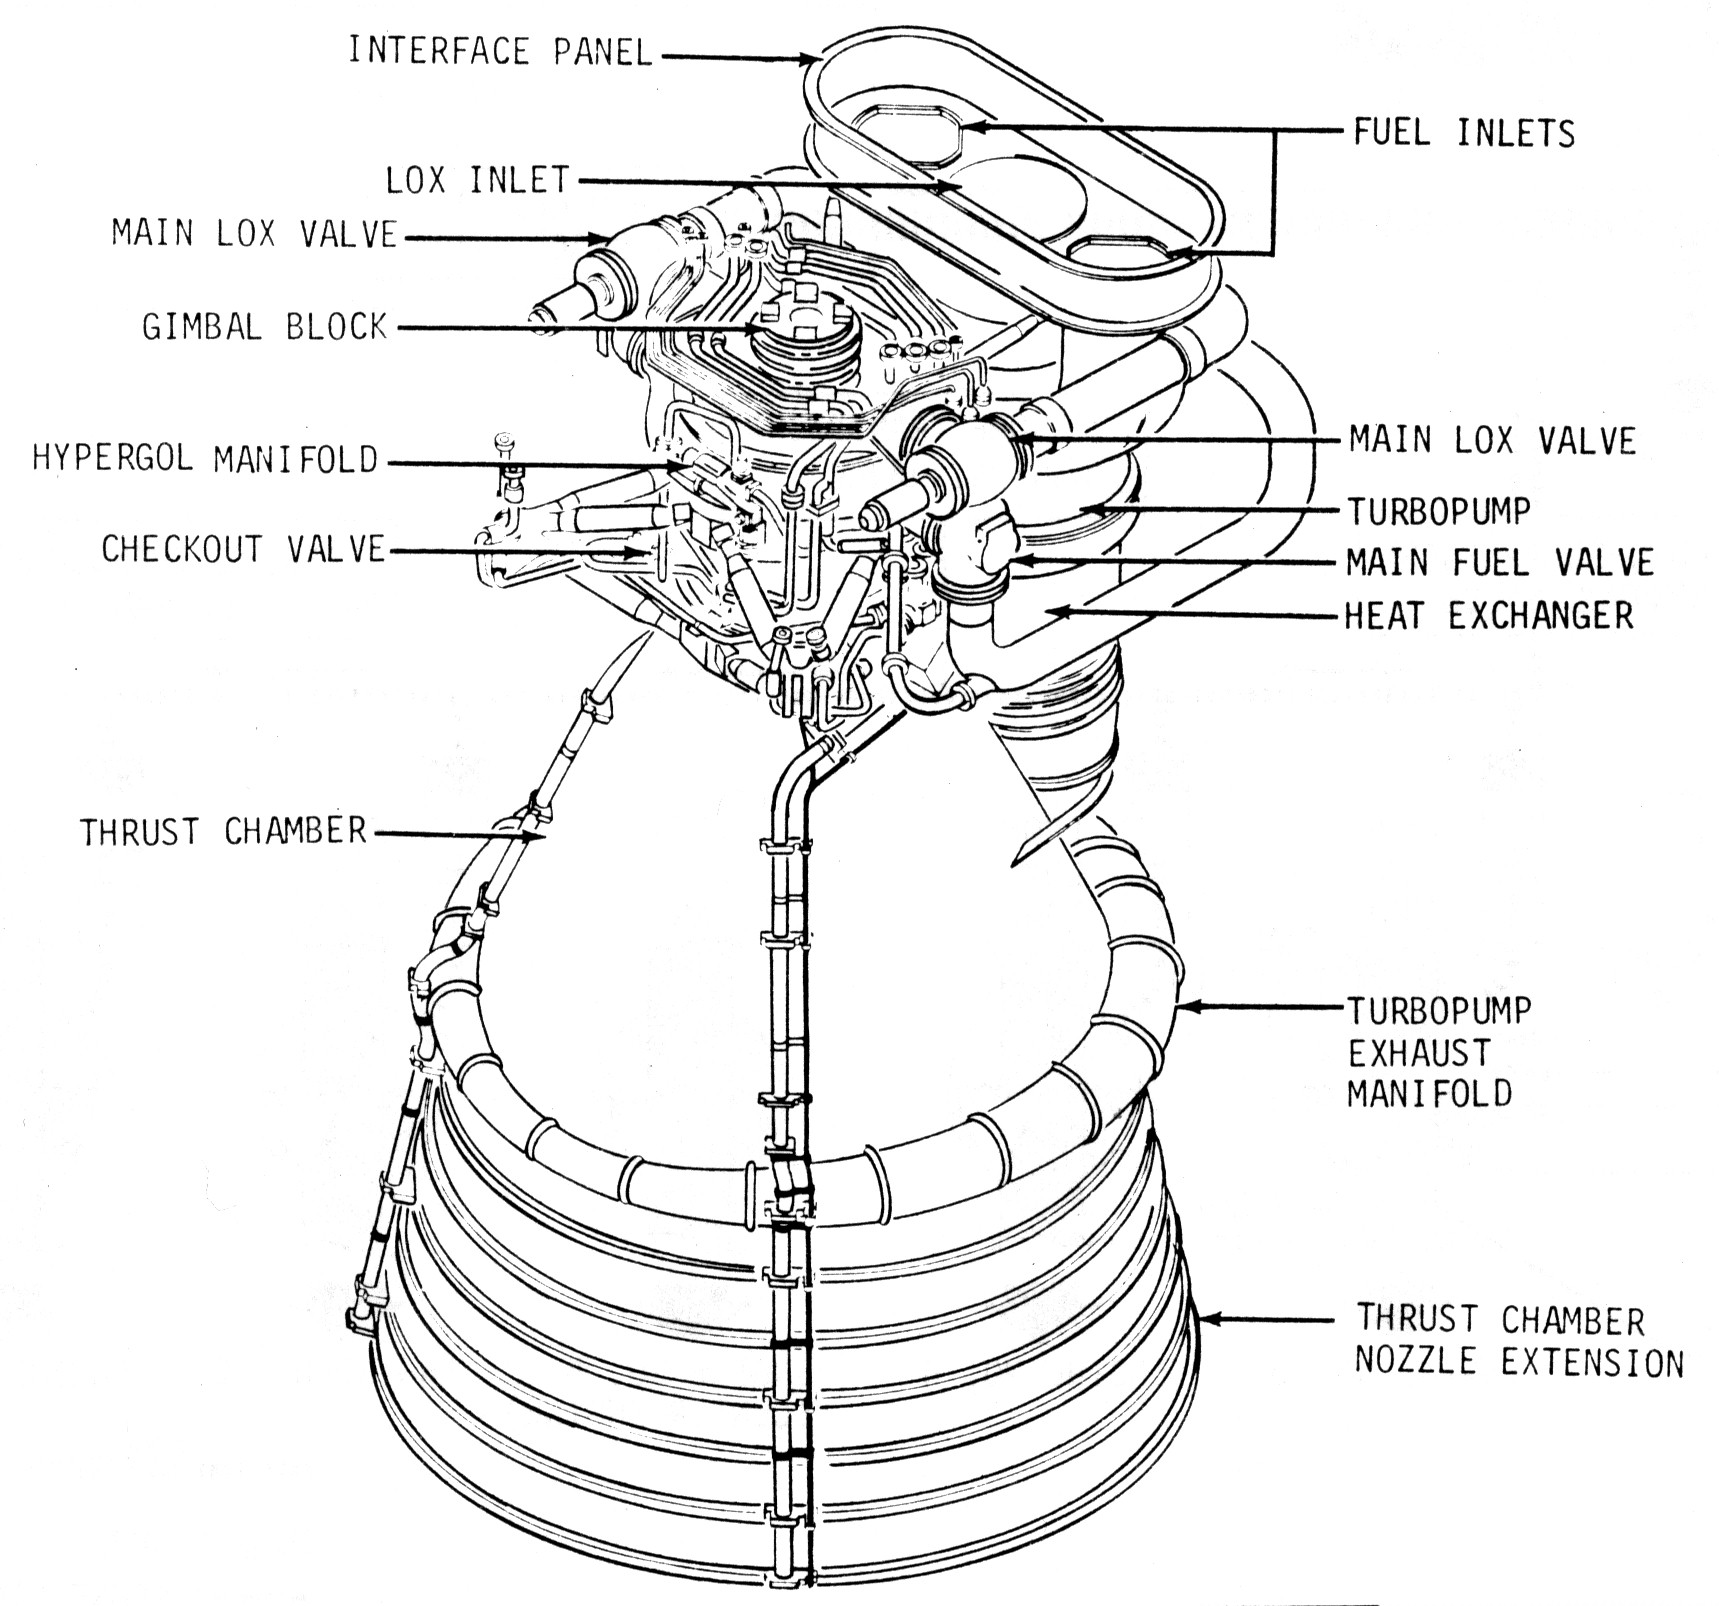
Saturn V F

Kawasaki Fa210d
Troy Bilt 13065 14hp Hydro Suburban Tractor S N
Generac 0972
Husqvarna Yth22k42

Bell Model 205a

Mtd 1p70fua Engine Parts Diagram For Engine Assembly 1p70fua
Honda Engines Gx270ut2 Qag2 Engine Tha Vin Gcbgt
Technical Information

Complete V
Poulan Po17542lt
Tecumseh Ov691ea

V6 Engine

Vintage Kawasaki H1 500 Exploded Engine Motor Diagram
Ariens 936058 960460028
Toro 61

Husqvarna Gt54cs
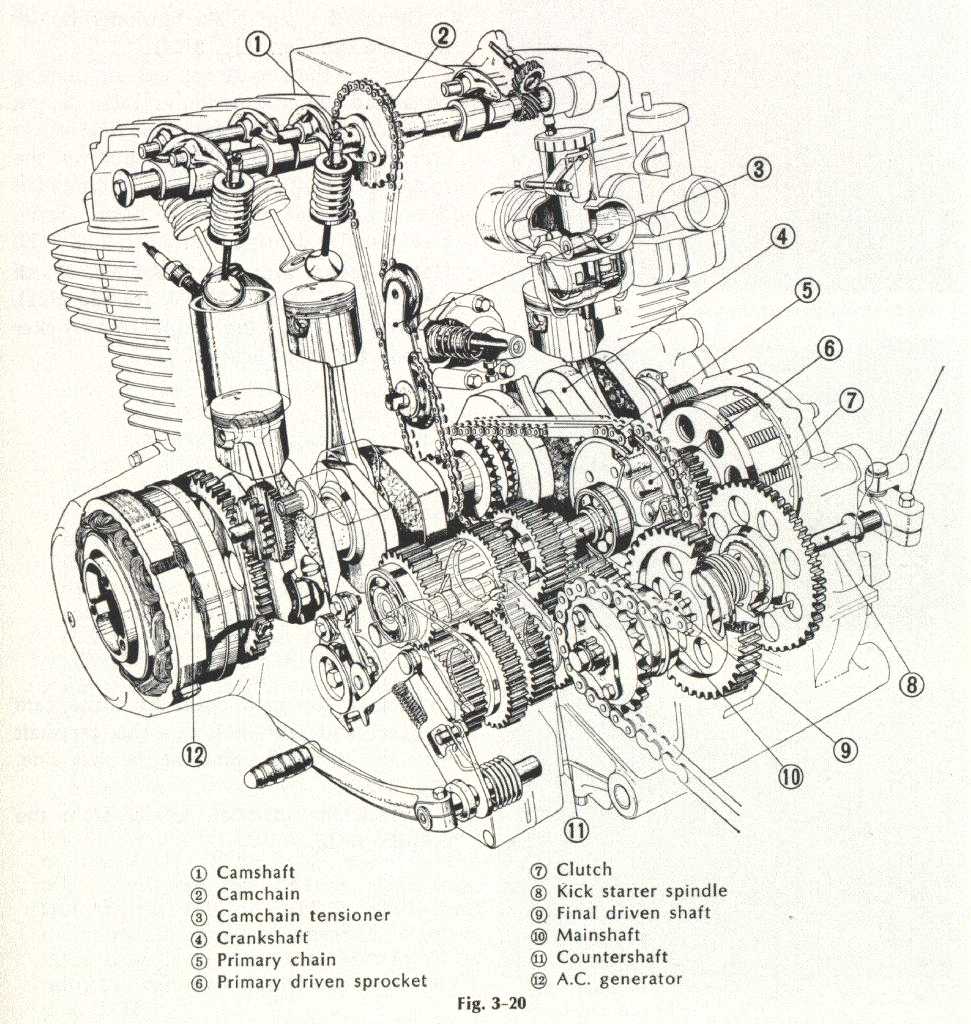
Honda Cb750 Engine Cutaway
Snapper Ec13v 4 Hp 2 Cycle Robin Engine Parts Diagram For
Snapper Eh18v 6 5 Hp 4 Cycle Ohv Robin Engine Parts
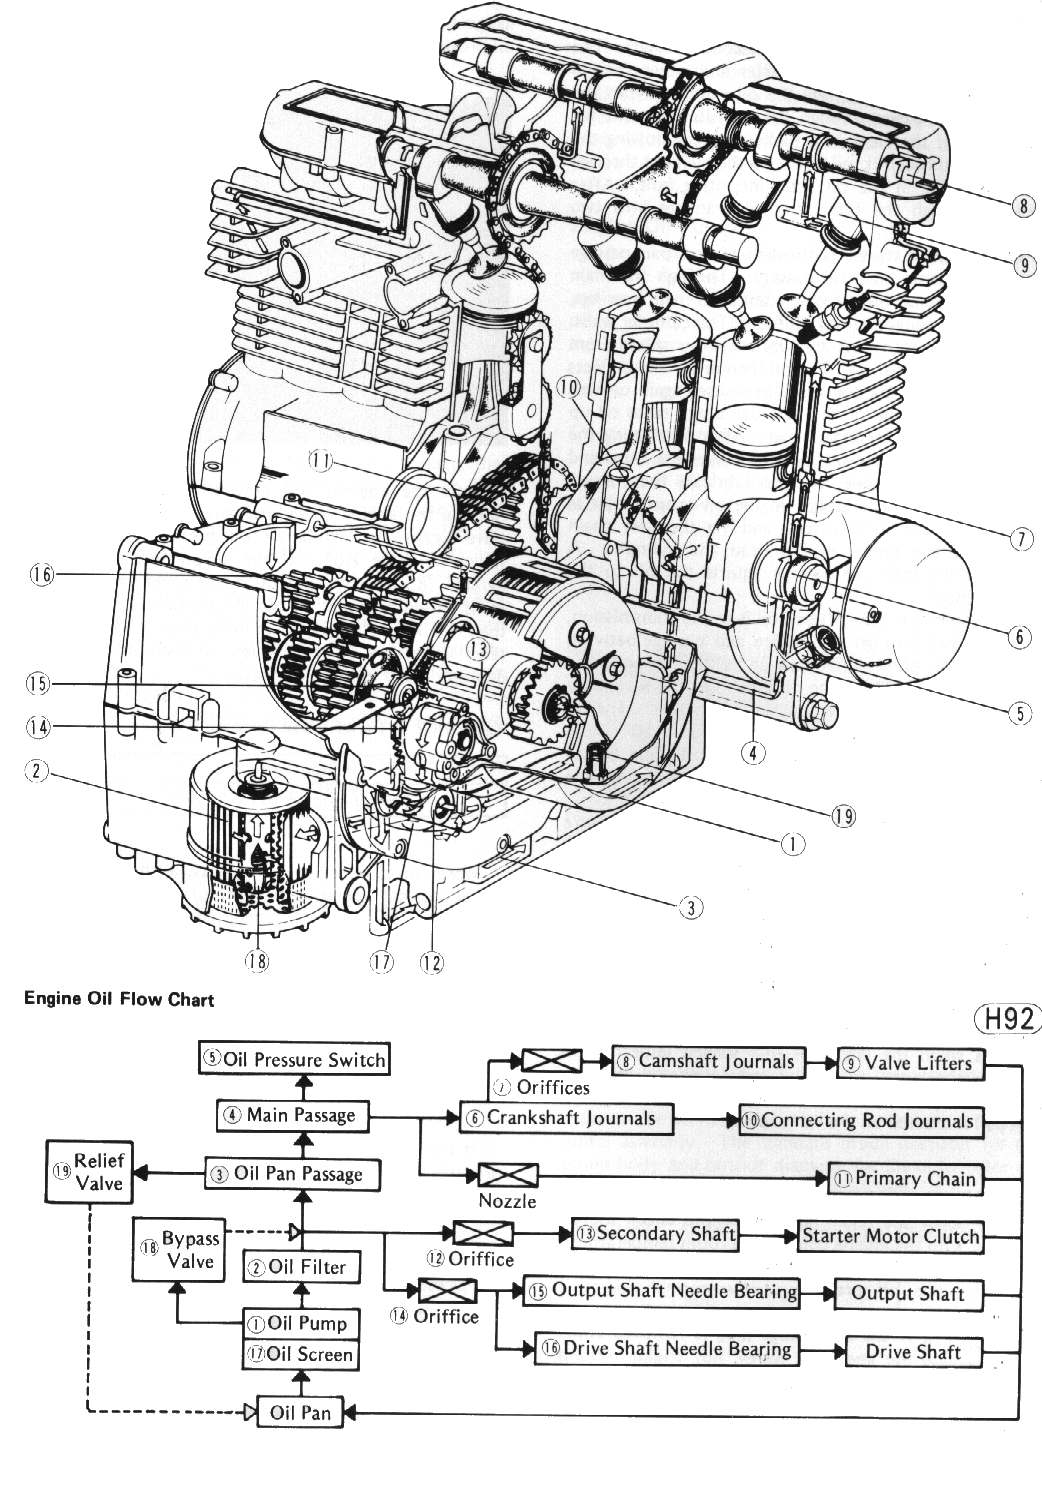
Dan U0026 39 S Motorcycle Four Stroke Oil Flow
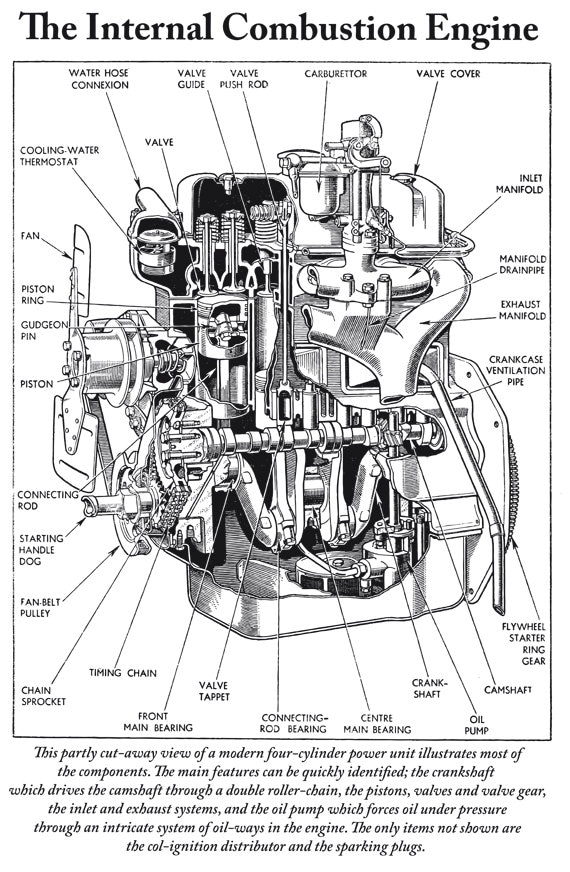
Items Similar To A Modern Internal Combustion Engine
Eap Vocabulary Dealing With Meaning
Tecumseh Tvt691

Repair Guides
Tecumseh Hm70
Tecumseh H22
Generac 4986
Mtd 315e610e000 1995 Parts Diagram For Engine And V
Kawasaki Fh721v

Possible Ford Mustang Gt500 Engine Drawings Leak

Cross
Tecumseh Av520

Marine Diesel Engines U2013 Parts Fuel Lubrication Cooling
Husqvarna 128 L 2008
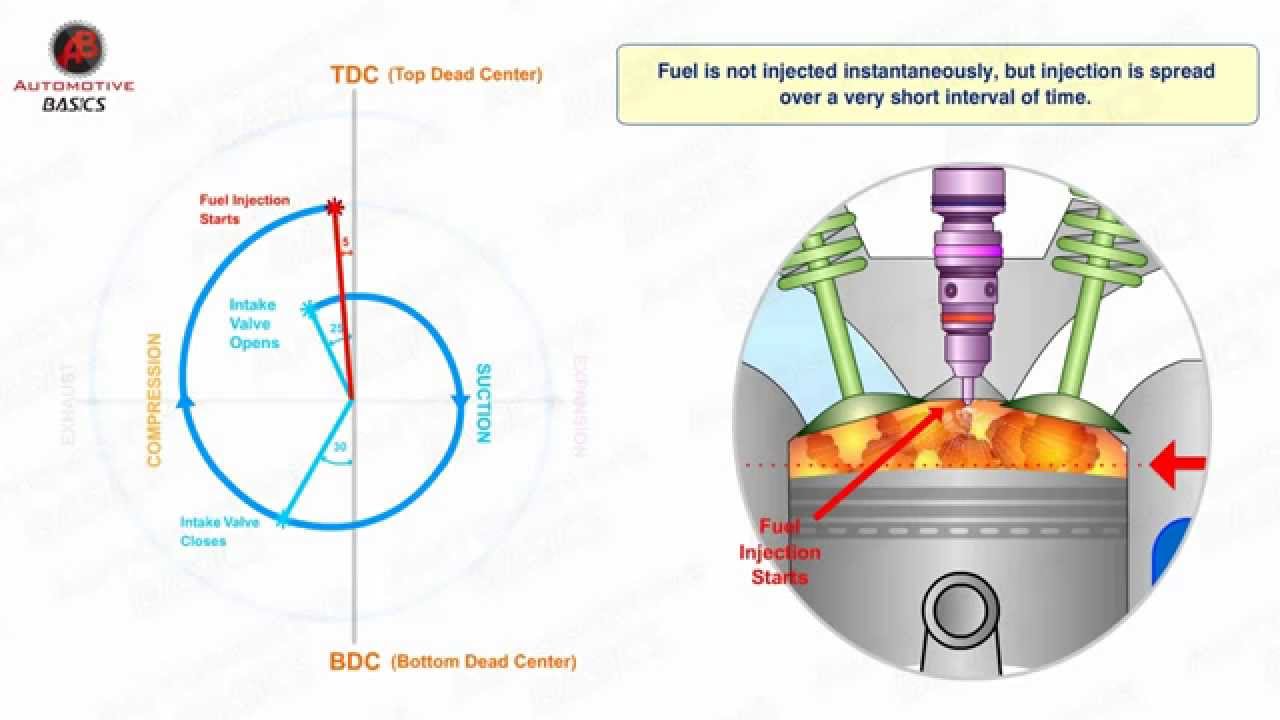
How Diesel Engines Work - Part


Repair Guides
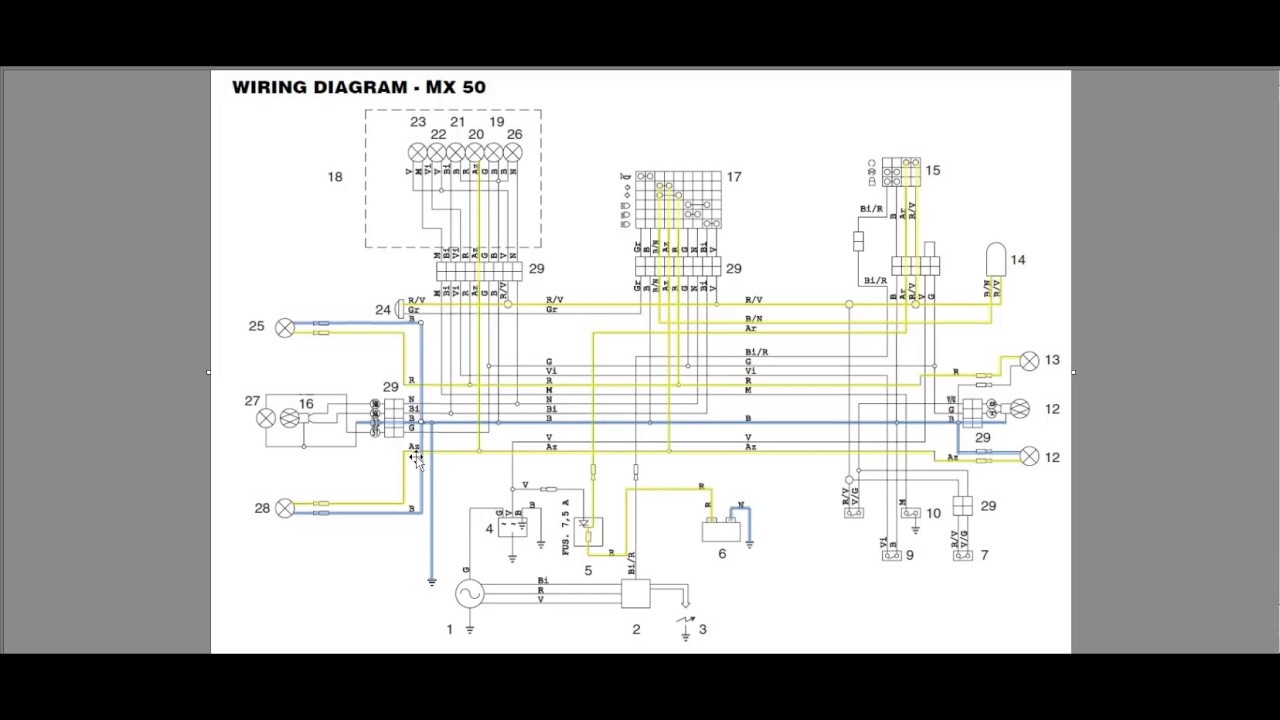
Step By Step Guide Understanding Motorcycle Wiring

Ford Vulcan Engine
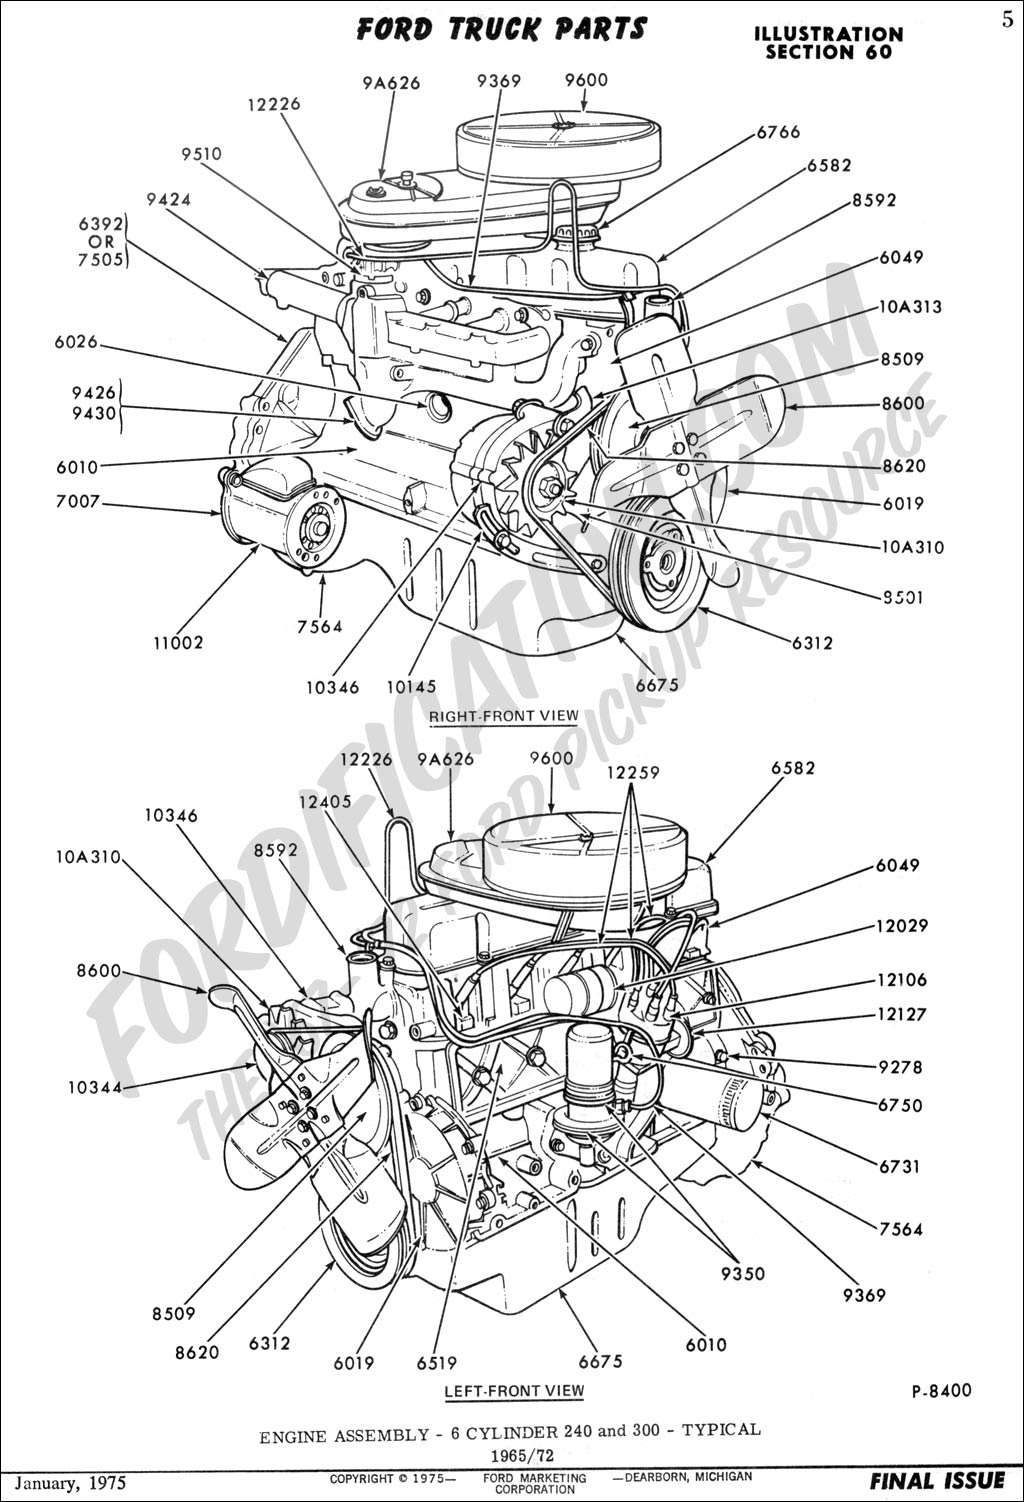
Ford Truck Technical Drawings And Schematics
Kawasaki Fh721v

Repair Guides
Kawasaki Fx850v

Generac 4704
Husqvarna Gt 2254 96025000202 2005
Generac 4758 760
Diagram Peugeot Engine Diagrams
Download Peugeot Engine Diagrams
To get to the Rold Route in Elden Ring, aka the Grand Lift of Rold, the first thing you need to do is get to Leyndell, Capital City. Then, proceed through the area until you’ve killed Morgott, The Omen King. Then and only then will you be able to open the double doors that lead towards the lift.
After defeating Morgott in the Royal Capital, your next task in Elden Ring is to reach the Rold Route on the other side. This guide will outline how you can easily find your way there and...
In this video, you’ll learn how to reach the Rold Route in the Elden Ring.
How to get to the Rold Route in 'Elden Ring' explained: As long as players know where the start point of the Rold Route begins, it won't be hard to find it again through multiple playthroughs. To get to the Rold Route in Elden Ring, you must first defeat Morgott, the Omen King.
To reach the Rold Route in Elden Ring, first, go to Leyndell, Royal Capital. Proceed through the Legacy Dungeon until you face Morgott, Omen King —the true identity of Margit, The Fell Omen.
From the site of grace, head up the stairs and take a left down the road. Follow the road until you reach a large door. After opening the door, you can continue up the road where there is a lift on your left near the end. This lift brings you to the Rold Route, but it will be blocked by golden light until Morgott is defeated.
Do you know where the Rold Route is in Elden Ring? This guide tells you how to find it and what to do there!
The easiest way to get to The Rold Route is by heading to the Avenue Balcony Site of Grace after defeating Morgott, The Omen King. From there, head up the stairs next to you and turn left. Keep on that path until you reach the big doors. They should be open after defeating Morgott. Go up the stairs.
But before that, you need to locate the Rold Route, which requires a few steps. This guide will provide all the information you need to find and access the Grand Lift of Rold using the Rold Route.
This content will guide you through Capital city to defeating the two bosses and finally opening the Rold Route to reveal the Consecrated Snowfield region. Let’s Begin.
3 way switch,3 way switch wiring,3 way switch wiring diagram pdf,3 way wiring diagram,3way switch wiring diagram,4 prong dryer outlet wiring diagram,4 prong trailer wiring diagram,6 way trailer wiring diagram,7 pin trailer wiring diagram with brakes,7 pin wiring diagram,alternator wiring diagram,amp wiring diagram,automotive lighting,cable harness,chevrolet,diagram,dodge,doorbell wiring diagram,ecobee wiring diagram,electric motor,electrical connector,electrical wiring,electrical wiring diagram,ford,fuse,honeywell thermostat wiring diagram,ignition system,kenwood car stereo wiring diagram,light switch wiring diagram,lighting,motor wiring diagram,nest doorbell wiring diagram,nest hello wiring diagram,nest labs,nest thermostat,nest thermostat wiring diagram,phone connector,pin,pioneer wiring diagram,plug wiring diagram,pump,radio,radio wiring diagram,relay,relay wiring diagram,resistor,rj45 wiring diagram,schematic,semi-trailer truck,sensor,seven pin trailer wiring diagram,speaker wiring diagram,starter wiring diagram,stereo wiring diagram,stereophonic sound,strat wiring diagram,switch,switch wiring diagram,telecaster wiring diagram,thermostat wiring,thermostat wiring diagram,trailer brake controller,trailer plug wiring diagram,trailer wiring diagram,user guide,wire,wire diagram,wiring diagram,wiring diagram 3 way switch,wiring harness
